
With Lenyxo and Cloudflare, you can use your own domain and secure your connection using Cloudflare SSL. In this article you will learn how to properly configure your domain + Cloudflare and SSL.
Now, due to DNS propagation, this could take a few hours depending on TTL (Time To Live)
If you get lucky and DNS propagates fast, this could just take +40 minutes.
Tools you need:
- A registered Freenom account
- Lenyxo Dashboard account
- Patience (For DNS)
- Cloudflare account
Note: In this article we present free domains from Freenom, you can also use any other paid domain from another domain registrar, we recommend Namesilo
So first of all, search for your wished domain here.
We recommend using 12 months (FREE) because you do not have to tirelessly log into Freenom and renew it every 3 months.
TIP: Do not use the .tk domain! It is banned from Lenyxo!
Then register and click agree to the Terms of Service and then checkout.
Congrats! You got your domain name!
Now, go here and find your domain name that you just registered. (Be logged in Freenom for this)
You should see something similar to this:
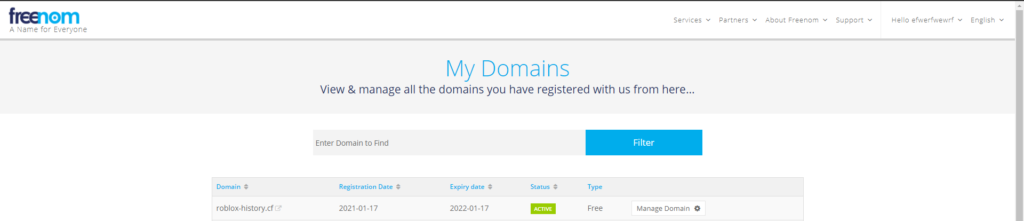
Once you are in, click on Manage Domain

You should see something like this. Short guide of the numbers:
- Your domain status
- Your domain registration date
- Your domain expiry date OR before you have to renew domain.
Now click on Management Tools and click Nameservers]
Now, click Custom Nameservers and enter the following nameservers:
Nameserver 1: ns1.lenyxo.eu.org
Nameserver 2: ns2.lenyxo.eu.org
Then just click Change Nameservers and now it is time for the wait!
Meanwhile, you wait, you can check the propagation here
DNS propagation takes usually a few hours but can take up to 24 hours to propagate due to DNS caching
Now, after it works, register the domain but this time as a Custom Domain.
After you registered your domain, wait some time, and should work as a web browser.
Now, enter your site URL into the search bar and it should pop up with Directory Listing
If you see that, congratulations! Your site is up and running.
Now, create a Cloudflare account and add your site to it.
Now, go back to FreeNom and replace the current NameServers with the ones Cloudflare gives you, and now wait more.
Now, go to the DNS section in Cloudflare:

and make new CNAME records as:
Name: @
Target: (your main domain found in vPanel)
Now, the second CNAME record:
Name: www
Target: @
Note: Do not insert the CNAME records though vPanel only trough Cloudflare!
Now, wait a bit and try to ping your website through CMD:
ping (yourdomain)
If it does not work, something has gone bad, try setting the records at Cloudflare again.
So, if it works, you are done! Now, for the SSL, just go to the SSL tab:

Now, click on flexible, wait a few minutes and try entering your site with https!
Once everything is set up, you can start making your safe website today!
Warnings:
- Using Flexible SSL mode while trying to force all traffic to HTTPS can cause ERR_TIMED_OUT error.
- To use full or full (strict) you need your own SSL through SSL tool (Please set CNAME records at Cloudflare and use DNS only proxy on records, else it will not work.
- Pinging the server after adding to Cloudflare will just ping the Cloudflare side, not your origin server. (To prevent DDoS attacks)